Exterior Wall Repairs at 120 Bloor Street East, Toronto
Every project is unique and the Quality Hotel project in London was no exception. A key challenge for the contractor was to execute the large scope of work while minimizing disruption of the day-to-day operations of the Hotel. In addition, installation of wall ties at an acute angle into the floor slabs made for an uncommon challenge. To minimize disturbances to the Hotel and control production costs, the contractor devised a strategic solution enabling the efficient performance of diverse tasks by a small, elite crew of trained personnel. The success of this story was the solid partnership of owner, consultant, tie-manufacturer and contractor, working together toward a common goal: the successful retrofit of a previously deficient cavity wall system. The Restoration Team: Owner Maprop Investments, Representative: Michael Barker of Heylar Associates; Consultant Ann De Mey, M.Eng., P.Eng. and Troy Humber, Halsall Associates; Project Manager John Garwood, Everest Restoration; Project Foreman Gary Mowbray.
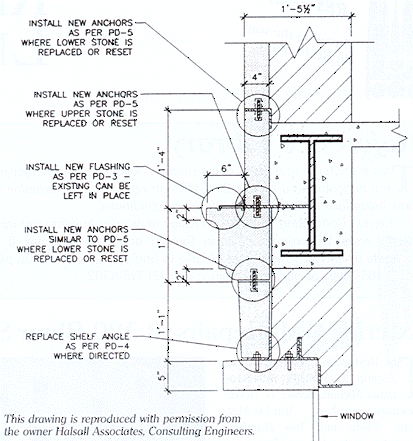
This project involved exterior wall repairs to the old “Crown Life Building,” 1950, located at 120 Bloor Street East in Toronto.
The scope of work included:
- Complete repointing of the stone facades;
- Replacement of several badly deteriorated stones;
- Stone resetting and various repairs using stone “dutchmen”, matching stone inserts, or “plastic” repairs using Jahn M70 stone repair mix;
- Cleaning of existing steel elements (i.e., lintels) and painting. Through wall flashing to be included, at these locations;
- New lead-coated copper flashing with underlayment at parapet cap and localized areas elsewhere; and
- Cleaning of the exterior elements: stone, concrete, glass, and several stainless steel surfaces. During testing prior to cutting out the mortar joints, it was determined that the existing mortar had a twelve percent lead content. Litharge, a monoxide of lead, was often used as a plasticizer in proprietary mortars up to the 1970’s.1 It is, therefore, important to run lead- content tests on existing mortar, prior to launching a repointing project, especially on structures built or repointed prior to the 1980’s.
To facilitate mortar removal without endangering stone work, a single cut down the center of the mortar joint was performed using 4″ diameter motor-driven diamond grinding wheels. To protect workers and the public from contaminated dust, a dust-free vacuum system was used; a Tuc-vac dustless joint and tuck-pointing housing was added to the mini-grinders to collect mortar dust and debris. The remaining mortar was cut out by hand using sharp chisels, the crew wearing protective filter masks. Mortar debris was collected and placed in drums for removal from site.
The key point to note here is that the content of the existing mortar joints required specialized procedures. Paints, mortars, and other building components encountered during a restoration project may all require special handling for the safety of the crew, as well as others.
When planning a project, then, the possibility of encountering hazardous products suggests the need for testing at an early stage, either prior to tendering or before project startup. Costs may escalate, depending upon the procedures required, and extra costs are best exposed as early as possible.
The stone used for replacement/ repair purposes was an Indiana light-grey limestone from the Victor Oolitic Quarry, with a sandblast finish to match the weathered appearance of the existing.
Fasteners, anchors, and other structural metal were stainless steel. Dutchmen were set in place with the assistance of stainless steel pins set in Sika Dur 35 High-Mod LV.
Replacement mortar was a cement: lime: graded aggregate mix, suitably soft and plastic to absorb stress and movement without significant transference to adjacent stone units.
For purposes of consistency and control, the Engineering Consultant elected to use Restomix, as supplied by Daubois Inc. This type of mix also breathes well, allowing the walling to dry out.
The joints were lightly tooled to yield a slight concave shape and placed by hand in lifts using pointing slicks. Lime-rich mortar requires exposure to air and time to react with carbon dioxide in order for oxidation to take place. Placing the mortar in 12 mm lifts allows each lift a chance to react. Deeper repointing does not properly set within an acceptable time-frame.
One of the unforeseen issues of the project was the discovery of just how much mortar was missing. Many of the stones were originally set on pads of mortar with the joint pointed at the outside face, but not to the full depth. Consequently, a lot of extra time and mortar placement was required in order to correct the deficiency.
In addition, weathering of the joints had penetrated further than expected with a corresponding increase in deep repointing; that is, more lifts adding to both labor and material costs. Conditions such as this are difficult to anticipate until work begins. There is wisdom in the tradition of including a ten percent contingency allowance in a project budget overtop cash allowances and contract prices.
The horizontal wash surfaces of the stone parapet, cornice, and capitals were provided with extra, long-term, protection with the addition of lead-coated copper flashing. The primary function of the flashing was to deflect rainwater, and provide a drip edge to protect the limestone units from excessive wear and moisture penetration.
The final task for this project will be cleaning. Often a controversial procedure with historic buildings, this 1950’s structure will be lightly cleaned using nebulous spray equipment and potable water.
Limestone is relatively self-cleaning and does not normally require the use of intrusive chemicals or abrasives. The walls will be soaked, allowing dirt to move to the surface where a low-pressure wash-down (with light scrubbing, where necessary), can gently remove freed particles.
In summary, this project provided a good opportunity to highlight unforeseen conditions, hazardous materials, and heritage restoration concerns. Please call us should you wish further information on this project.
Written by: David Alexander Organ
No Comments